Thursday, November 25, 2010

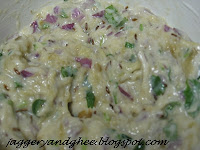
Roasted Eggplant Bharit - A Yogurt Based Eggplant Dish

I remember this dish perfectly, my grandma used to make it often. Today, as I become more aware of various world cuisines, I am convinced that this is a wonderful way to eat eggplant. Okay, so this dish needs raw onions. So if you are not a big fan of raw onions, this dish is not for you. Note that white, mild onions are the best for this recipe. Also, this dish has a yogurt base which complements the onions and roasted eggplant really well. It pairs nicely with fresh phulkas. I think it will also work as a dip for baked whole wheat pita chips.

You will need:

1 roasted eggplant with the skin and most seeds removed. The browned and roasted flesh of the eggplant should be mashed. (I normally apply a coat of vegetable oil to the eggplant and then place it in the broiler. It roasts really well. The key, is to turn the eggplant every five minutes or so to roast it uniformly. When the eggplant is evenly roasted, the inner flesh will separate from the skin easily.)

1/2 a medium sized onion cut not too coarsely. (I used a red onion in this recipe. I would recommend a white onion. I did not have one at hand when I made this dish. I would also cut the amount of onion if the eggplant is small to about a quarter.)

1 tbsp chopped cilantro.

1/2 tsp of brown sugar.
salt to taste.
1/2-3/4 cup yogurt.

For the ghee (canola oil can be used as a substitute for ghee) tadka:

1 tsp ghee.
1 small green chilli.
1/4 tsp asafoetida.
1/2 tsp cumin seeds.

Mix the mashed eggplant and chopped onions in a serving bowl. Add the cilantro. Mix thoroughly.


Now, add the yogurt, salt and sugar. Mix and keep aside. In a copper bottomed, large sputtering spoon (a small kadhai will also do), heat the ghee (or oil). When hot, add the cumin seeds. Once they crackle add the asafoetida and green chili.


Now, pour this spice and chili mixture on the eggplant. Be careful because the ghee is hot and the yogurt is at room temperature. Some ghee may splash outward. Stir and serve immediately.


ENJOY!

Pumpkin Seeds Chutney

I thought of this recipe one day when I was roasting raw pumpkin seeds (pepitas). I try to incorporate these seeds in my regular diet because they are so nutritious (see their nutrition profile on whfoods.com), especially in their zinc and iron content. These seeds are a great way to get these essential minerals for vegetarians. This chutney is dry in its texture and goes well as a spread on buttered whole wheat toast for a healthy snack or breakfast. I often have it with ghee and piping hot phulkas. My aunt-in-law loved it when she tried it over dinner a few weeks ago.

To make this chutney, you will need:

1 cup raw pumpkin seeds (I buy them from Trader Joe's), roasted in a pan over medium heat.
1 whole dried red chilli (you can one more if you like spicy food).
1 tsp cumin powder.
1/2 tsp tamarind concentrate.
5 curry leaves.
salt and brown sugar to taste.

After roasting the pumpkin seeds, add them to a food processor. Add all the remaining ingredients and grind the seeds to a fine powder. To add some protein, you can roast 1 to 2 tbsp of chana dal (available from Bob's Red Mill) and add it to the above ingredients. Voila, your chutney is ready.


Sunday, October 31, 2010

Ricotta Cheese Cake with an Almond Meal Crust

FOR THE HOLIDAYS - A PERFECT DESSERT

I have been reading up about the health benefits of Ricotta Cheese and while I admit that this cheese is high in saturated fat, a controlled portion can contribute to your daily intake of B-vitamins, selenium, protein and calcium. I came up with this recipe for a cheese cake when I was looking for wholesome and nutritious non-Indian dessert recipes. I used almond meal (from Trader Joe's) to make the crust of the cake. The end product was an immensely satisfying dessert that you can whip up in less than an hour of prep time, about 30-40 minutes of bake time and more importantly, it can be made the day before you entertain family or friends because it stores very well in the refrigerator. Just bring it to room temperature before serving and make the berry sauce fresh! Some of the photographs below are courtesy of my spouse.

Here are the ingredients:

Cheese filling:
1.5 cups Ricotta cheese
1.5 - 2 tbsp all purpose flour
3 egg whites
6 tbsp honey
3-4 tsp vanilla extract
1/8 tsp cinnamon powder
1/8 tsp freshly grated nutmeg

Crust:
1.5 cups almond meal
1.5 tbsp fresh melted butter
2 tbsp brown molasses sugar

Berry Sauce:
1/2 cup frozen blueberries (strawberries will do to, or you can try a mix of frozen berries)
1/2 - 1 cup water
1 clove
1 small piece of cinnamon bark
1 tbsp brown sugar

To make the crust, brown the almond meal slightly in a pan. To this add the butter and sugar. Mix thoroughly. Once the mixture is cool enough that you can touch the flour, place the mixture in a pre-greased (with very little melted butter) pie dish.


Preheat the oven to 350 F.

Then, in a large bowl, beat the egg whites and add the ricotta cheese. Blend thoroughly. Then sequentially, add the fl our, honey and vanilla extract, blending at each addition. I used a spatula to blend the ingredients. Finally add the spices.


Now, pour this cheese filling onto the pie crust and bake at 350 F for about 30 minutes or until when a fork, when inserted into the cheese filling comes out clean.

In the mean time, make the berry sauce by combining all the ingredients in a sauce pan and cooking the berries un til they are soft (but nor squishy!). Make sure you have some liquid in the sauce pan, it can be handy for decoration.

Serve a piece of the cheese cake in a serving dish and decorate with the berry sauce.


ENJOY
!


Sunday, October 17, 2010

Sweet Potato and Bell Pepper stuffed Whole Wheat Wrap

I am back with a whole bunch of new recipes. I will start off with a personal favorite, my take on a sweet potato enchilada that I had eaten in a restaurant in La Jolla, San Diego a couple of years ago. I cannot recollect the name of the restaurant, but the taste of the dish stayed with me. I tried to recreate it in my kitchen using very little cream, no baking and whole wheat wraps.

To stuff two large whole wheat wraps you will need:

1 large sweet potato (white), almost cooked and cut into 1/2 inch cubes or mashed.
1 cup chopped red bell peppers in thin strips.
1 teaspoon cumin powder.
1 teaspoon dried oregano.
1 tablespoon olive oil.
1 tablespoon creme fraiche (I use the one from Trader Joe's).
A generous helping of Tabasco Smoked Chipotle Pepper Sauce.
Salt to taste
Grated Cheddar Cheese as per your taste.

In a saucepan, heat the olive oil. Once the oil is hot (do not let it smoke, olive oil heats up pretty fast) add the cumin powder and oregano. Saute for about 30 seconds and then add the red bell pepper strips. Once the strips are cooked, add the sweet potato cubes and continue cooking for a minute or two. The red bell pepper strips will provide the necessary liquid to hold the vegetables together. At this point, add a generous helping of the Tabasco sauce. I like my stuffing to be spicy, if you like it mild, I would recommend a few drops of the sauce. Finally add the creme fraiche and cook for another minute or so.

Place the wheat wrap on a cast iron griddle to heat it evenly. Then add several spoonfuls of the above mixture to one half of the wrap. Top with the grated cheese.


Fold over the wrap and cut halfway thought the center. Serve with fresh salad.

ENJOY!

Saturday, July 24, 2010

Ricotta Cheese Munchies - A healthy sweet treat

I was introduced to Ricotta cheese by my aunt. When I first bought this cheese from the local Trader Joe's store, I was not sure how I could use it in dishes other than pasta. After following some interesting recipes on the web, I decided to make sweet munchies with this cheese. The recipe is really simple. No baking required, however, some patience is needed because you have to cook the cheese until all its water content is evaporated.

Ingredients:

1 box of Ricotta cheese: I like the one at Trader Joe's the best.

Few treads of saffron immersed in 1/8 cup warm milk: This releases the color and flavor of the saffron into the milk.

1/4 cup honey

Powdered cardamom seeds.

Jaggery or Brown Sugar as per taste.

Empty the Ricotta cheese into a heavy bottomed stainless steel pan and cook on medium heat until the water evaporates and a crumbly, dry cheese is left behind. To this, add, the honey, milk and saffron mixture, cardamom powder and jaggery. Mix thoroughly until any traces of milk are all gone. The mixture should be dry. Now, use your hands to shape small portions of the cheese into any form you like. I typically make "modak" shapes with this cheese. This shape can be easily obtained by gently shaping a ball of this mixture with all five fingers to form a tower like structure! You could also roll the cheese on saran wrap into a 1/2'' thick slab and cut pieces with cookie cutters. Store each piece in separate chocolate cups and serve with a drizzle of maple syrup or honey! The texture of the cooked and dry ricotta goes very well with the honey, saffron and cardamom. These sweet treats store well in the refrigerator and are so easy to make.

ENJOY!


An Introduction to Ghee a.k.a. Clarified Butter

"Ghee" has been used in Indian cooking for a long time. My fondest "edible" memories from my childhood all revolve around ghee. The aroma of freshly made ghee is ethereal and no store bought ghee really does justice to any recipe when compared to homemade ghee. Also, given the URL of my blog, it only seems fair to begin with a recipe to make ghee. There is nothing to it really. Besides some patience, all you will need is good quality butter made from cream with no other additives.

Ghee is used to sauté spices before adding pulses such as lentils to make dal, the classic Indian version of a lentil like soup. In my recipes, I also use ghee to sputter cumin seeds to add to a traditional "raita" which is a yogurt based salad. Ghee is also spread over freshly made "rotis" or other Indian breads.

I start with one stick of butter that has been chopped into smaller pieces. I place these in a stainless steel pan and set the heat to a low to medium setting as the butter melts. Once the butter has fully melted, I change the setting to low until the butter clarifies and takes a golden - brown color. I like my ghee this way, and nothing beats this ghee when eaten with fresh "phulkas" (puffed Indian bread made with unleavened dough) and "jaggery" (a solid form of sugar formed by evaporating sugarcane juice). Once the browning is noticeable, turn off the heat and allow the pan to cool. Transfer the ghee to a steel or glass jar for storage. I store ghee at room temperature in the pantry. Also, I do not like to make large portions of ghee, I prefer to make it on an as need bases. Ghee retains its freshness for up to a month (as per my observations). Below is a picture of the butter turned into ghee when it is almost done. Enjoy!